
Download the MadMapper 6.0.10 Review (The Most Advanced Application for Video & LED Mapping) from this link…
![]()
Overview of the Software
Table of Contents
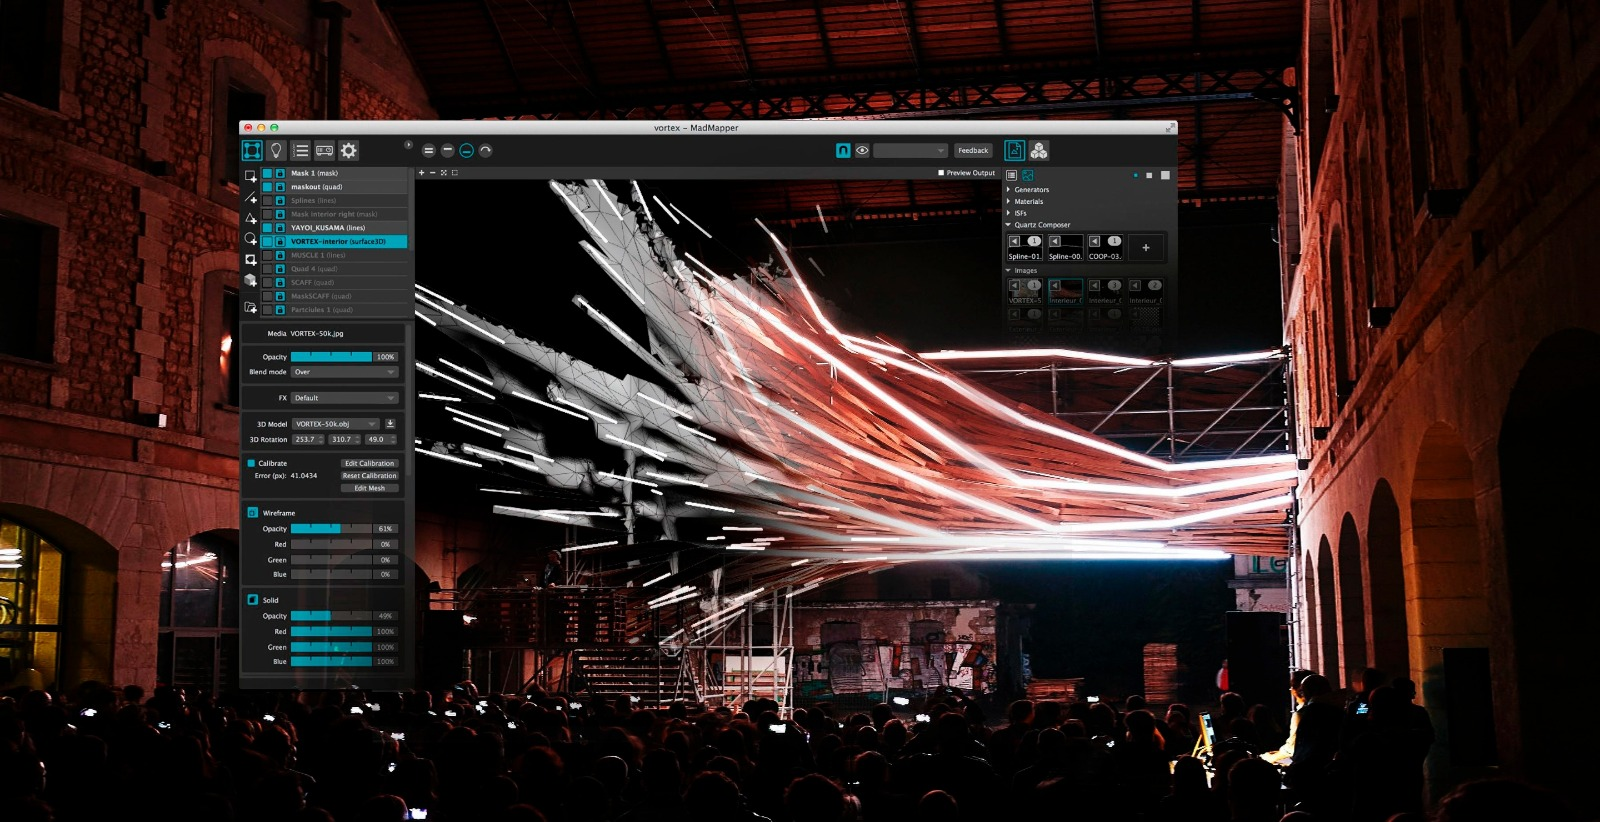
MadMapper, developed by GarageCube, is a industry-standard video mapping software that transforms complex geometric surfaces into dynamic visual displays. Unlike basic projection tools, MadMapper allows artists and technicians to map visuals onto irregular 3D shapes, building facades, and thousands of individual LED pixels.
Version 6.0.10 reinforces its reputation by bridging the gap between pre-visualization and real-time output. It is widely used in live events, theater productions, permanent art installations, and retail displays.
Key Features of MadMapper 6.0.10
This version introduces a refined feature set optimized for performance and creative flexibility.
-
Real-Time Warping & Blending: Mask and edge-blend multiple projectors for seamless large-scale displays.
-
LED Mapping (Pixel perfect): Directly map video to individual LEDs using industry protocols like ArtNet, sACN, and KI-Net.
-
3D Projection Mapping: Import 3D models (OBJ, Collada) to pre-visualize complex mappings before arriving on-site.
-
Syphon/Spout Support: Share high-resolution video textures between applications on macOS (Syphon) and Windows (Spout).
-
Generative Content Engine: Create real-time visuals using the built-in modular generator (no external plugin required).
-
Audio Reactivity: Trigger and modulate visual parameters via FFT analysis from live microphones or line inputs.
What’s New in MadMapper 6.0.10
This latest maintenance and feature release focuses on stability and workflow acceleration.
-
Improved LED Fixture Library: Added support for over 50 new commercial LED strips and pixel matrices.
-
UI Scalability Enhancements: The interface now scales better on 4K and ultrawide monitors.
-
Faster OBJ Loading: Optimized 3D geometry importer for complex architectural models.
-
MIDI Mapping Presets: New default presets for popular controllers (APC40, Launchpad).
-
Stability Fixes: Resolved rare crashes when using NDI sources on Windows 11.
System Requirements
Before downloading MadMapper 6.0.10 from the official GarageCube website, ensure your hardware meets these requirements.
Minimum Configuration:
-
OS: Windows 10 (64-bit) or macOS 10.15 (Catalina)
-
CPU: Intel Core i5 (6th gen) or Apple M1
-
RAM: 8 GB
-
GPU: Dedicated GPU with 2GB VRAM (NVIDIA GTX 1050 or AMD equivalent)
-
Storage: 500 MB for installation
Recommended Configuration:
-
OS: Windows 11 or macOS 13 (Ventura) / 14 (Sonoma)
-
CPU: Intel Core i7 (10th gen) or Apple M2/M3
-
RAM: 16 GB or more
-
GPU: NVIDIA RTX 3060 / AMD Radeon Pro 5500M or higher with 6GB+ VRAM
-
Storage: SSD with 1 GB free space for cache files
Installation Guide (Official Source)
To ensure legal compliance and software stability, always download MadMapper from the official GarageCube store.
Step-by-Step Installation
-
Purchase or Trial: Visit the official MadMapper website. Download the fully functional 30-day trial or purchase a license key.
-
Run Installer:
-
Windows: Execute the
.exefile. Allow administrator permissions when prompted. -
macOS: Mount the
.dmgfile and dragMadMapper.appto theApplicationsfolder.
-
-
Verify Gatekeeper (macOS): If macOS blocks the app, right-click the icon and select “Open” to override Gatekeeper.
-
Activate License: Launch the software. Enter your license key (sent via email) in the registration window.
-
Configure Outputs: Go to
Preferences > Outputsto enable your secondary displays or LED interfaces.
How to Use the Software (Beginner to Pro Workflow)
MadMapper has a steeper learning curve than basic presentation software, but its modular interface is logical.
Step 1 – Surface Setup
-
Import a photo of your physical surface (e.g., a building corner or stage prop).
-
Use the
QuadorGridtool to draw mapping zones directly over the photo.
Step 2 – Content Assignment
-
Drag a video file or a generative module into the “Content” panel.
-
Assign that content to your newly created surface.
Step 3 – Warping & Calibration
-
Switch to
Outputmode. Adjust corner pins, bezier curves, and keystone sliders until the video perfectly aligns with the real-world object.
Step 4 – LED Mapping (Advanced)
-
Navigate to the
LEDtab. Define your LED matrix dimensions (e.g., 50×50 pixels). -
Patch each universe to a physical Art-Net output interface.
-
Use the “Pixel Perfect” tool to draw sub-selections of LEDs for precise control.
Best Use Cases for MadMapper 6.0.10
This software is not a general media player; it is a specialist tool for specific professional domains.
-
Live Music Visuals: Synchronize projection mapping with MIDI timecode from a DJ or live band.
-
Architectural Projection: Map video onto irregular building facades for brand activations or light festivals.
-
Retail & Window Displays: Control both a video projector and a grid of LED strips inside a store window.
-
Theater & Opera: Create moving set pieces using rear-projection mapping on curved scrims.
-
Interactive Installations: Combine MadMapper with OSC (Open Sound Control) to let visitor movement change visuals.
Advantages and Limitations
Understanding the trade-offs helps users decide if this is the right tool for their workflow.
Advantages
-
Precision: Sub-pixel warping accuracy superior to competitors like Resolume Arena.
-
LED Integration: Native LED mapping removes the need for separate pixel mapping software.
-
Low Latency: Direct GPU-based processing ensures real-time responsiveness for live performance.
-
Active Community: Extensive user forums and tutorial libraries.
Limitations
-
No Native NLE (Non-Linear Editing): You cannot edit video clips inside MadMapper; you must prepare content in Premiere Pro or DaVinci Resolve.
-
Steep Learning Curve: Requires 10–20 hours of practice to master 3D projection mapping.
-
Price Point: The professional license is an investment suited for rental houses or production companies rather than hobbyists.
-
Windows vs. macOS: The Windows version historically receives minor feature updates later than the macOS version.
Alternatives to MadMapper
Depending on your specific needs, one of these professional tools might be more suitable.
| Software | Best For | Key Difference from MadMapper |
|---|---|---|
| Resolume Arena | VJ performance & live mixing | Better for real-time clip triggering; weaker for architectural pre-calibration. |
| HeavyM | Beginner projection mapping | Simpler workflow but lacks advanced LED fixture control. |
| TouchDesigner | Interactive & generative installations | Node-based environment (more flexible but steeper learning curve). |
| QLC+ | Pure DMX/LED lighting control | Open-source but no video mapping capabilities. |
Frequently Asked Questions (FAQ)
Q1: Is MadMapper 6.0.10 compatible with macOS Sequoia?
A: Yes, version 6.0.10 is officially compatible with macOS 14 (Sonoma) and the beta builds of macOS 15 (Sequoia). Always check the release notes before updating your OS.
Q2: Can I use MadMapper with only one projector?
A: Absolutely. While the software supports multi-projector arrays, it works perfectly with a single output for small art installations or home theaters.
Q3: Does MadMapper support 4K and 8K video files?
A: Yes. Performance depends on your GPU’s VRAM. An NVIDIA RTX 3080 or higher is recommended for smooth 8K playback with multiple layers.
Q4: What protocols does the LED mapping feature use?
A: MadMapper outputs standard lighting protocols including Art-Net, sACN (E1.31) , DMX over IP, and KI-Net for commercial LED controllers.
Q5: How do I get a commercial license for a rental house?
A: GarageCube offers floating network licenses for rental companies. Contact their sales team directly for volume pricing.
Q6: Can I import 3D scans from an iPhone LiDAR sensor?
A: Yes. Export your LiDAR scan as an OBJ file (using apps like Scaniverse or Polycam) and import that OBJ directly into MadMapper for 3D mapping.
Final Thoughts
MadMapper 6.0.10 remains the most advanced application for professionals who need to combine video projection with LED pixel control. While it requires dedicated learning, its precision, low latency, and robust protocol support make it the gold standard for permanent installations and touring shows.
For legal, stable operation, always purchase a license directly from GarageCube or an authorized reseller. The 30-day trial is fully functional and allows you to test complex mappings before committing to a purchase. If your work demands architectural accuracy or hybrid LED/video output, MadMapper is the definitive choice.
Premium Software Support Service
If you need professional help with software installation, setup, or technical configuration, our team is available to assist you.
Contact & Support
For quick assistance and latest updates, connect with us using the links below:
🔹 Direct Telegram Support
https://t.me/PlayoutKing
🔹 Official Telegram Updates Group
https://t.me/yourgroup
Service Policy
- Remote testing available through AnyDesk before confirmation.
• Verify the setup and performance before completing the order.
• Support available for single or multiple systems.
• Step-by-step guidance to ensure smooth installation and working environment.
Our goal is to provide reliable technical assistance so your software runs smoothly without interruptions.