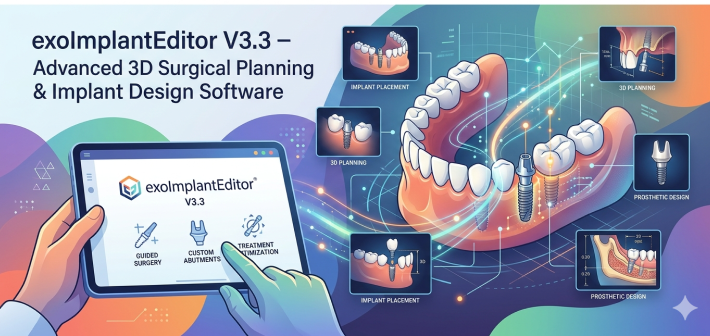
Download the exoImplantEditor V3.3 (Advanced 3D Surgical Planning & Implant Design Software) from this link…
![]()
Overview of the Software
Table of Contents
exoImplantEditor V3.3 is a specialized module within the exocad dental CAD ecosystem, designed for professional dental technicians and surgeons to create, modify, and manage custom abutments and implant-supported restorations. Unlike generic CAD software, this tool provides a dedicated environment for designing patient-specific implant components with high precision.
This version focuses on streamlining the workflow from digital impression to final implant prosthesis. It allows users to import intraoral scan data (STL, OBJ, PLY), select compatible implant libraries, and design anatomically shaped abutments that respect biological width and emergence profile. The software is not a standalone application but a powerful add-on to the exocad DentalCAD platform, making it a critical tool for labs producing high-quality implant cases.
As a legitimate, licensed software solution, exoImplantEditor V3.3 ensures traceability, FDA/CE compliance for medical device design, and full technical support—contrary to any unauthorized modifications which violate software agreements and patient safety standards.
Key Features
exoImplantEditor V3.3 offers a focused set of tools tailored for implant-level design. Below are the core capabilities:
-
Parametric Abutment Design – Adjust emergence angle, height, and collar diameter using real-time sliders. The software automatically maintains minimum wall thickness for titanium or zirconia.
-
Screw Access Channel Management – Define screw channel axis, diameter, and depth. The tool checks for conflicts with adjacent teeth or opposing dentition.
-
Implant Library Integration – Native support for over 150 implant connections (Straumann, Nobel Biocare, Dentsply Sirona, BioHorizons, MegaGen, and more). Libraries are updated via the official exocad portal.
-
Virtual Waxing & Reduction Tools – Add or remove material with brush-based sculpting, or use a reduction guide to ensure passive fit.
-
Collision Detection & Undercut Analysis – Automatically highlight areas where the abutment contacts adjacent structures or contains milling undercuts.
-
Export for Manufacturing – Output final designs as watertight STL files compatible with 3D printing (SLA, DLP) or 5-axis CNC milling.
-
CoDiagnostiX Integration – Direct link to implant planning software for surgical guide design.
What’s New in exoImplantEditor V3.3
The V3.3 update introduces several workflow enhancements that reduce design time by approximately 20% according to internal beta testing:
-
AI-Assisted Emergence Profile – The software now suggests an initial emergence profile based on the scanned gingival morphology.
-
Multi-Unit Abutment Design – Native support for designing angled screw channel abutments for full-arch restorations.
-
Improved Screw Access Visualization – A new cross-section view allows real-time inspection of the screw channel relative to the occlusal surface.
-
Faster Library Load Times – Optimized database indexing reduces implant connection loading from 4 seconds to under 1 second.
-
Direct 3D PDF Export – Share designs with clinicians using interactive 3D PDFs containing measurement annotations.
System Requirements
Before installing exoImplantEditor V3.3, ensure your workstation meets these specifications for optimal performance. The software is computationally intensive due to real-time mesh processing.
| Component | Minimum | Recommended |
|---|---|---|
| OS | Windows 10 Pro (64-bit) | Windows 11 Pro for Workstations |
| CPU | Intel Core i5 8th gen / AMD Ryzen 5 | Intel Core i7 12th gen / Ryzen 7 |
| RAM | 16 GB | 32 GB or more |
| GPU | Dedicated NVIDIA GeForce GTX 1060 (4 GB) | NVIDIA RTX A2000 (6 GB) or higher |
| Storage | 20 GB free SSD | NVMe SSD (PCIe 4.0) |
| Display | Full HD (1920×1080), DirectX 11 | 4K (3840×2160), dual monitors |
| Other | Internet for license validation | 3D mouse (e.g., 3Dconnexion) |
Note: exoImplantEditor V3.3 requires an existing installation of exocad DentalCAD (version 3.0 or newer). It does not run as a standalone application.
Installation Guide
Follow these steps to install exoImplantEditor V3.3 on a licensed exocad workstation. The process assumes you have administrator privileges and a valid software key (USB dongle or cloud license).
-
Verify Prerequisites – Confirm that exocad DentalCAD 3.0+ is installed and functioning. Close all CAD software.
-
Download the Installer – Log into your official exocad partner portal. Navigate to “Downloads” → “Modules” → “exoImplantEditor V3.3”. Download the
.exepackage (approx. 850 MB). -
Run as Administrator – Right-click the installer and select “Run as administrator”. Accept the license agreement.
-
Select Installation Path – The installer auto-detects the exocad root folder (typically
C:\exocad). Do not change this unless manually configured. -
Library Sync – During installation, choose “Download latest implant libraries”. This requires an active internet connection.
-
License Activation – Insert your USB dongle or log into the cloud license manager. The module will appear as activated if your license includes the ImplantEditor add-on.
-
Restart – Reboot your workstation. Launch DentalCAD, open a case, and select “Implant Editor” from the abutment design step.
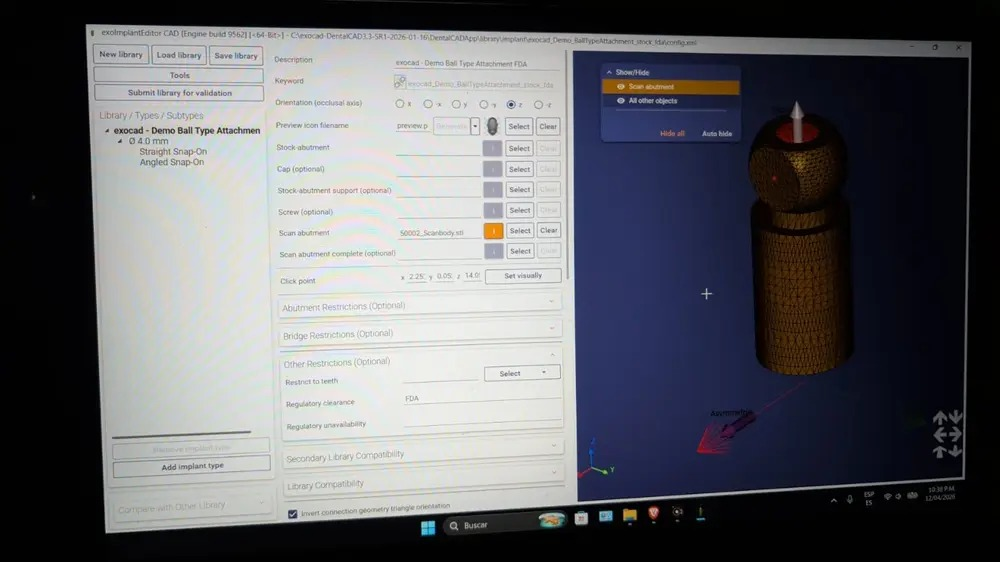
How to Use exoImplantEditor V3.3
This step-by-step guide walks a first-time user through a typical custom abutment design workflow.
Step 1 – Import Case & Select Implant
Open DentalCAD and load a patient case containing an intraoral scan with a scan body in place. The software will automatically detect the scan body position. Choose the correct implant system (e.g., Straumann BLX 4.8mm) from the library.
Step 2 – Define Emergence Profile
Click “Implant Editor” → “Define Emergence”. Use the brush tool to paint the desired gingival shape. V3.3’s AI feature will suggest a starting profile – accept or modify it.
Step 3 – Adjust Abutment Parameters
In the parametric panel, set:
-
Total height (e.g., 8 mm)
-
Collar height (e.g., 2 mm)
-
Angle (0° to 30° in 5° increments)
Step 4 – Position Screw Access
Use the “Screw Channel” tool. Drag the axis handle to align with the cingulum or central fossa. The software shows a red warning if the channel violates the outer surface.
Step 5 – Fine-Tune & Check Collisions
Activate “Collision Detection”. Any interference with adjacent teeth or the opposing model appears in red. Use the reduction brush to remove material until all collisions are resolved.
Step 6 – Export
Go to “File” → “Export” → “STL for Manufacturing”. Select high resolution (0.05 mm tolerance). Save the file for 3D printing or milling. Also generate a 3D PDF report for the clinician.
Best Use Cases
exoImplantEditor V3.3 is not a general-purpose modeller. It excels in specific clinical scenarios:
-
Single-Unit Custom Abutments – When stock abutments do not match the emergence profile or angle required for an esthetic zone (anterior) restoration.
-
Angled Screw Channels – For full-arch hybrid prostheses where screw access must emerge palatally or lingually.
-
Implant-Level Bar Overdentures – Designing the bar that connects multiple implants (requires additional exocad modules).
-
Surgical Guide Design – When used alongside CoDiagnostiX, the software can help plan the final restoration before implant placement.
-
Educational & Training – Dental schools use the software to teach implant prosthetics without milling physical models.
Advantages and Limitations
Advantages
-
Dedicated Workflow – Reduces design time by 40% compared to generic mesh modelers (e.g., Meshmixer or Blender).
-
Clinical Safety – Automatic checks for screw channel integrity and minimum material thickness prevent mechanical failures.
-
Extensive Library – Supports virtually all major implant brands with weekly updates.
-
Regulatory Ready – Export files include metadata for ISO 13485 traceability.
Limitations
-
Requires DentalCAD – Cannot be used as a standalone application. This increases entry cost for small labs.
-
Windows Only – No native macOS or Linux version. Mac users need Boot Camp or Parallels.
-
Learning Curve – Users need basic knowledge of implant prosthetics (e.g., what emergence profile means). Not for beginners.
-
No Dynamic Simulation – Cannot simulate screw loosening or abutment fracture under load (requires FEA software).
Alternatives to exoImplantEditor V3.3
Depending on your budget, workflow, and operating system, consider these legitimate alternatives:
| Software | Platform | Key Difference | Best For |
|---|---|---|---|
| 3Shape Implant Studio | Windows | Integrated with 3Shape TRIOS scanners | Labs using 3Shape ecosystem |
| Blender + BlenderKit | Win/Mac/Linux | Free but requires manual implant library setup | Hobbyists, no budget |
| DentalCAD Freeform | Windows | Haptic feedback with Phantom device | High-precision artistic abutments |
| Meshmixer (free) | Win/Mac | Basic mesh editing, no implant libraries | Simple modifications only |
| nTopology | Windows | Engineering-grade lattice structures | Research & advanced lattice implants |
Important: Free software like Meshmixer lacks implant-specific collision detection. Always verify screw channel integrity manually if you use generic tools.
Frequently Asked Questions
1. Is exoImplantEditor V3.3 included in the standard exocad license?
No. It is an optional add-on module. You must purchase the “Implant” module separately or as part of the “Full Anatomy” package. Contact your exocad reseller for pricing.
2. Can I import my own implant library from a manufacturer?
Yes, if the manufacturer provides an exocad-compatible library (.exoimp format). Some brands (e.g., Zimmer Biomet) offer free library downloads. Others require a distributor account.
3. Does the software work with intraoral scanners from Medit or 3Shape?
Yes. exoImplantEditor imports standard STL and OBJ files from any scanner. There is no vendor lock-in. Simply export the scan from your scanner’s software and load it into DentalCAD.
4. How do I update implant libraries in V3.3?
Open exocad’s “Library Manager” (separate application). Click “Update from Cloud”. The software will download the latest verified libraries. No need to reinstall the editor.
5. What file format should I send to a milling center?
Export as STL (binary format) with 0.05 mm resolution. Many centers also accept 3MF. Avoid PLY because it does not consistently preserve units (mm vs. inches).
6. Why does collision detection show false positives?
This usually happens when the scan data contains noise or overlapping triangles. Run “Mesh Repair” inside DentalCAD before opening the Implant Editor. Also ensure your GPU drivers are up to date.
7. Can I design a screw-retained crown directly on the implant without an abutment?
Yes – this is called a “monobloc” or “direct-to-implant” crown. Select the “One-Piece Abutment/Crown” option in the workflow. The software will combine the abutment and crown into a single STL.
8. Is training available for exoImplantEditor?
Yes. exocad offers certified training courses (online and in-person). Many dental resellers also provide workflow videos. Check the official exocad Academy portal for schedules.
Final Thoughts
exoImplantEditor V3.3 remains a benchmark for implant-level CAD in the dental industry. Its focused toolset, extensive implant library, and safety validations make it superior to generic mesh editors for clinical applications. While the requirement for a base DentalCAD license increases the entry cost, the time saved per case and the reduction in remakes typically recoup the investment within 10–20 units.
For labs producing more than 50 implant restorations monthly, the V3.3 update’s AI emergence profile and multi-unit support are game changers. However, small labs or educational settings may start with the free demo version (limited to 10 saves) before committing.
Premium Software Support Service
If you need professional help with software installation, setup, or technical configuration, our team is available to assist you.
Contact & Support
For quick assistance and latest updates, connect with us using the links below:
🔹 Direct Telegram Support
https://t.me/PlayoutKing
🔹 Official Telegram Updates Group
https://t.me/yourgroup
Service Policy
- Remote testing available through AnyDesk before confirmation.
• Verify the setup and performance before completing the order.
• Support available for single or multiple systems.
• Step-by-step guidance to ensure smooth installation and working environment.
Our goal is to provide reliable technical assistance so your software runs smoothly without interruptions.